Number and Decimal
What is a Number input control?
A number control allows the user of the Adaptive Document to enter a decimal figure.
For example: Imagine you are creating an order details form for a custom office furniture manufacturing organisation. The users can use this form to fill in their requirements. You want to provide a set of input controls where the users can fill in the dimensions of their furniture requirement.

Wherever there is a requirement for the user to input a decimal value, the Number control can be used. It can accept both decimal and integer values. Hence, it has a wider application than Whole number control. Whole number control accepts only integer values. However, there would be circumstances when you want users to input strictly an integer value. In such cases Whole number control is used.
The fundamental difference being that Whole number control accepts integers, while number control can accept whole numbers along with decimals.
Apart from this fundamental difference, the two controls are very similar in nature.
What are the attributes for Number control?
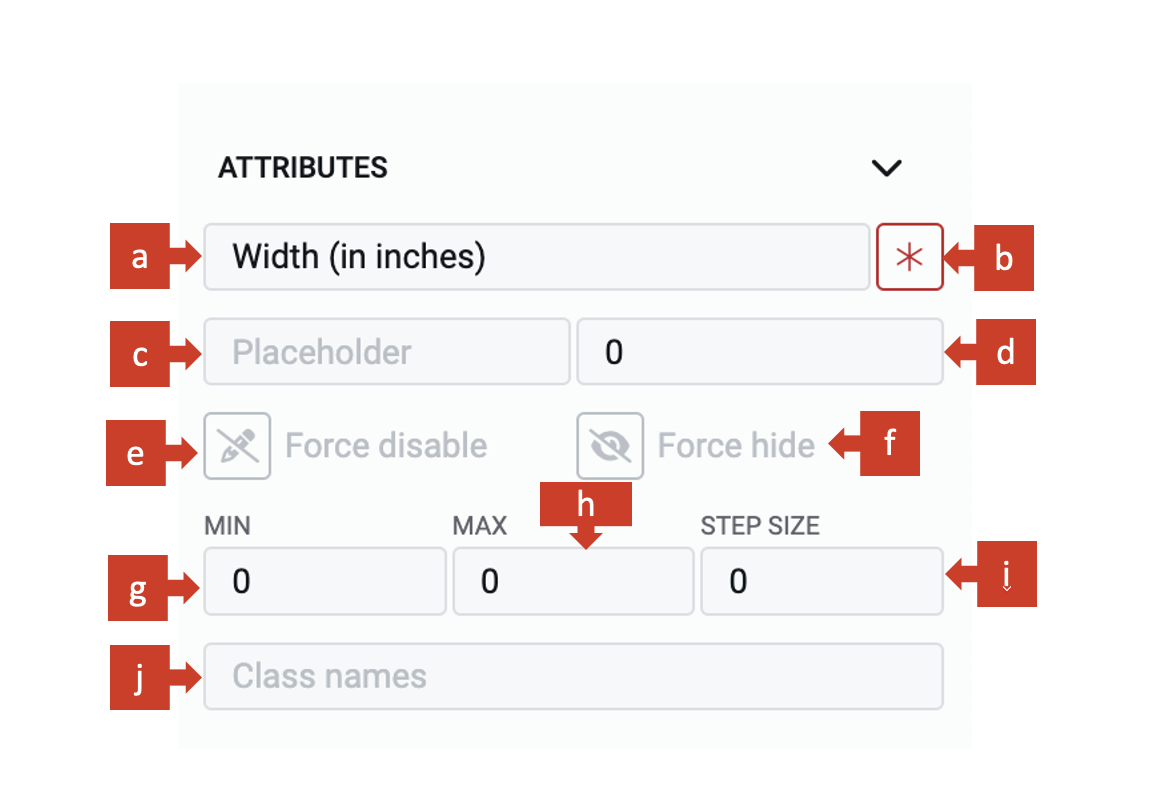
Consider the following image and corresponding list, sequentially explaining the fields of the attributes section for Number control.

a. Label - This field allows you to type the label to the Number control. The label shall appear above the element in the Adaptive Document and is used to provide context for the user.
The default label for the number control is Decimal.
b. Asterisk (*) sign - If you click ON this field, then an asterisk sign will appear next to the label. This is used to indicate a special message to the users of the document. For example - conditions apply, the element is mandatory etc.
It is important to note that the Asterisk sign is only a visual indicator and does not imply any logical condition on the control. For example - turning the Asterisk sign as ON will not make the number control a mandatory element for users. All logical behaviour for the control should be configured using conditions and validations.
c. Placeholder - The text entered in this field will appear in the number element as ghosted text. You can use this Placeholder field to provide short instruction to the users, about the information they need to fill in the element.
The Placeholder text is only for display purposes. The text filled in the Placeholder field is visible to the user only till the time, the user has not selected the element for typing value OR the number element does not have a default value (discussed next). If the user leaves the element blank, then the element will NOT have the Placeholder value and the blank value submitted for the element.
d. Default value - The number typed in this field becomes the default value for the element. If the user inputs a value to the element, then the default value will be replaced by the user entered value. If the user leaves the element blank, then the default value will be submitted as element value.
You can set a decimal value in the number default field. It can be a whole number as well. For instance: the default value can be 13.08 or 13.
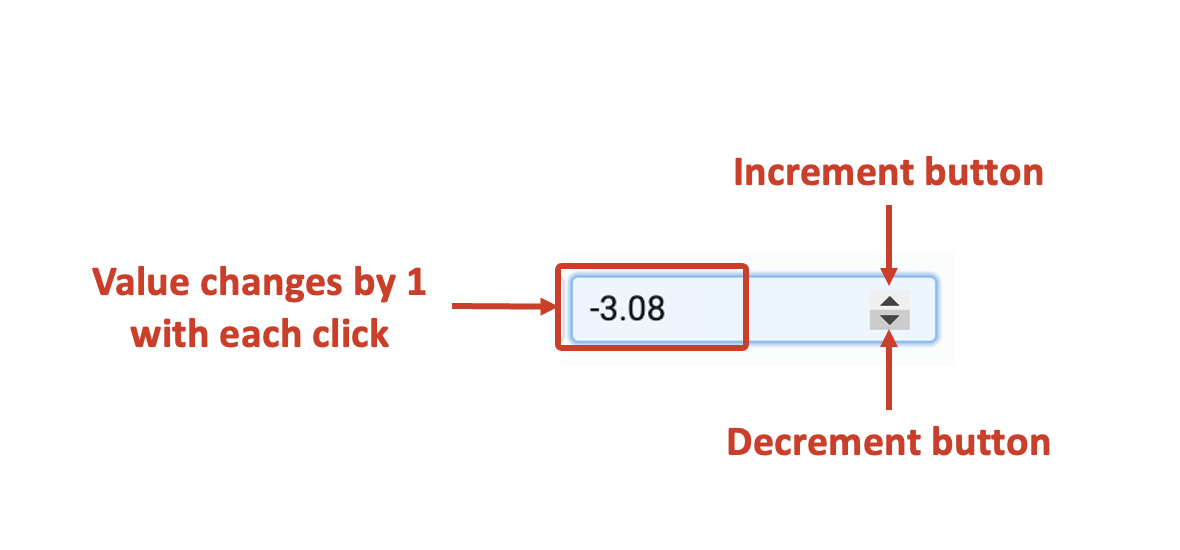
You can change the value using the increment / decrement buttons. Each click with change the number by +1 (increment button) or -1 (decrement button). For instance: if the default value is 13.08, a single click on increment button will make the value 14.08 and a single click on the decrement button will make the value as 12.08.
You can type in any positive value using the keyboard. However, to enter a negative value you will have to use the down-arrow (decrement) from 0 value. For instance: if you want to set default value as -3.08, set the value as 0, then hit the decrement button 3 times, the field will show -3. You can now append .08 to set the default value as -3.08.

A default value may be useful when you feel most users will fill out the same value, however, you still want to give them a flexibility to change the value of the element. For example - most people would want an office table of standard dimensions, however, someone may want to order a custom sized one.

e. Force disable - If this field is clicked ON, then it will supersede all enable conditions and the element will always remain in disabled mode.
This is useful when you want to display a dynamic piece of information to the users. For example - An Invoice showing the ordered table's dimensions. In such cases, while the table's dimension is a useful information, you do not want the users to change the same in the invoice. Hence the element will display the value, but will remain disabled for user input.
f. Force hide - If this field is clicked ON, then it will supersede all show conditions and the element will always remain hidden from the user.
This feature can be used in advanced Adaptive Documents, where you need to pass a certain value, like the cost of the furniture raw material, and do not want to show it to the user. The element will remain hidden from the user, and hence the user would not be able to see / enter any value to the element.
g. MIN - In this field, you can define the minimum value of input that the element can take from the user. For example - imagine the office table's height cannot be lower than 20 inches. In such cases, you would want to set Min = 20 for height element.
h. MAX - In this field, you can define the maximum value of input that the element can take from the user. For example - assume that the width of an office table can not be more than 60 inches. Hence, in such a case, you would want to set Max = 60 for width element.
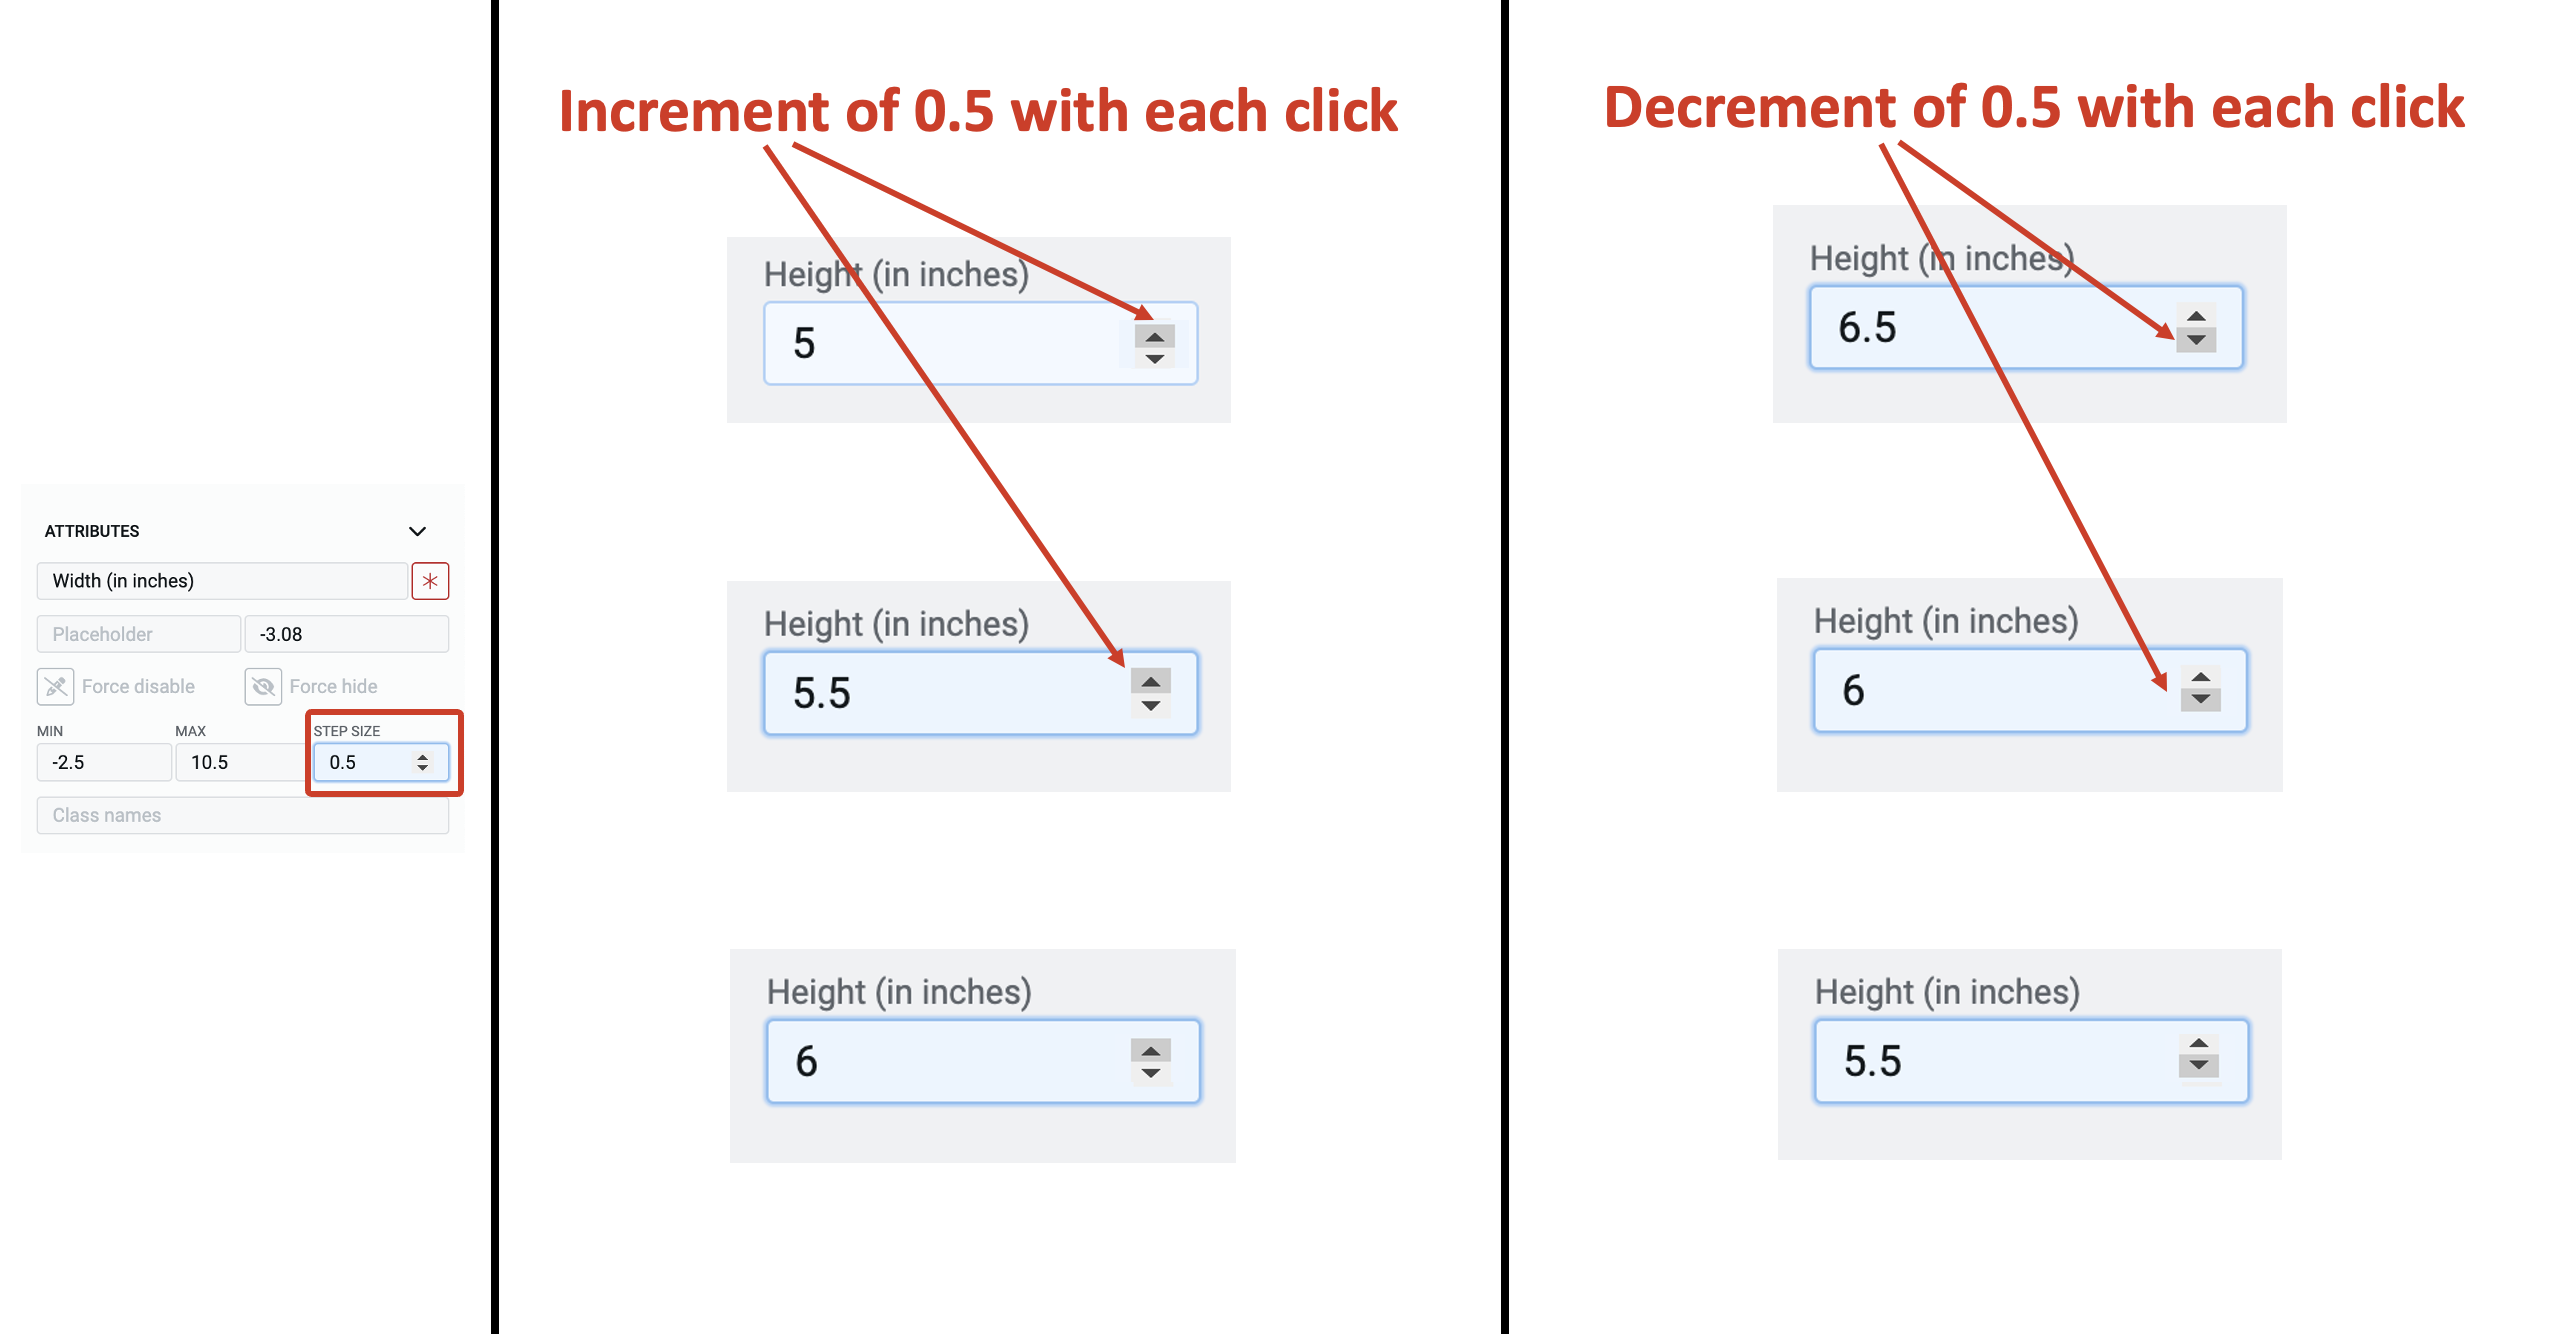
i. STEP SIZE - In this field, you can set the step-size which will define the change in the value of the element with each click of the increment / decrement button.
Assume that you have the value in the element as 5 and you have defined the Step-size as 0.5, then with each click of the increment button the value will increase by 0.5 ie. 5.5, 6, 6.5 and so on.
Further, with each click on the decrement button, the value will be reduced by 0.5 ie. 6, 5.5, 5 and so on.

You can increment and decrement values using the arrow keys of your keyboard as well.
j. Class names - In this field, you can type the name of the CSS class and the element will be styled as per the CSS class definition.