Menus
Menus are the chief means of navigating around a Rapid site. However, they have additional functionality, as will be discussed in this article. You can observe menu items in the Sidebar or in the Command Bar.
You can read a thorough explanation of how to create menu items. The various functions of a menu item are outlined below.
Navigating to a Page
A menu can navigate to another page in your Rapid site. The Sidebar is an example of this.
![]()
Clicking on the Tasks Portal menu item, for example, will navigate the user to a page that contains the Tasks Data Table as its main page component.
Expanding Menu Sections
Some menu items are used as "folders" or "containers" to hold other menu items. A menu item that contains other menu items will have a sideways chevron ( >) at the end of the menu button. When a menu folder is opened, its contents appear in a fly-out panel to the right.
In the example below, the "CRM" menu item does not navigate you to another page. Instead, it opens a fly-out panel that contains many other menu items such as "Leads", "Opportunities", "Accounts", etc.
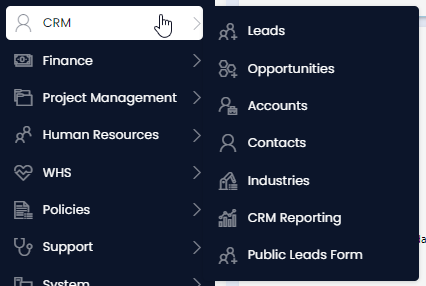
Arranging menu items in this way can help group together tables logically, and can reduce visual clutter in the Sidebar.
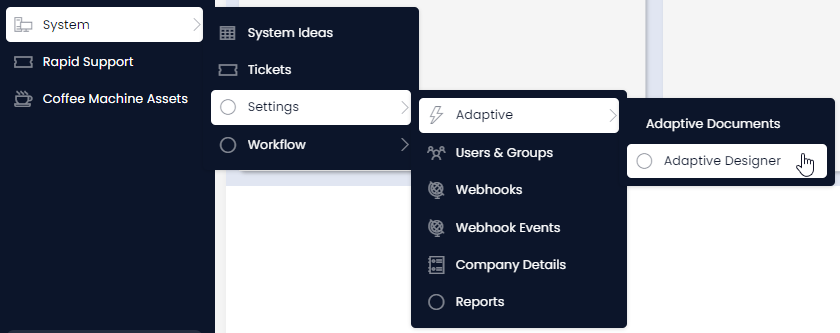
Nested Menu Fly-outs
Menu Fly-outs can open additional Menu Fly-outs. These "nested" fly-outs allow more complex grouping. They are, however, limited by the width of the screen that you are working on.
In the example below, the user has clicked on the following menu item fly-out:
System > Settings > Adaptive and has now arrived at the "Adaptive Designer" menu item that will navigate them to a different page.
Open a Hyperlink
A menu item can also open a hyperlink to an external website. This is useful if your company has another site it wants to link to. In this case, the menu button operates like a hyperlink or URL.
Note that Rapid Platform also provides an External Page Component for viewing webpages within your site if there is a particular website that is used frequently by employees.
Open App
You can create a menu button that opens one of Rapid's other applications, such as Explorer, Workflow, or Designer. Your System Designer can also specify a particular URL sub-path so that a button opens a particular Workflow diagram, or a particular Designer page, etc.
Perform Remote Action
A menu item can also interact other web applications such as Microsoft 365. Essentially, this type of menu item will send .json or simple code to another web application. This prevents you as a user needing to copy-and-paste data, or move between two different websites.
For example, this menu item could be used to trigger and run Azure Functions or Power Automate Flows. Essentially, it will send data from your Rapid site, to an external site.
Raise Create Webhook Action
This type of menu item action is also used to trigger an external Rapid application. By using a Raise Create Webhook Action results in a Webhook triggering. Note that this is different to a Process Diagram triggering, which is discussed in the next section.
This is typically used when you want to trigger the Created webhook signal event. For example, you may have a Workflow process that creates a new Contact item in your Contacts Table, as soon as a new Lead is created in your Lead Table. The process would then take the contact information added to the lead, and generate a contact using that information.
However, if a contact is deleted, you would want to generate the contact again automatically (rather than by manually copying-and-pasting information). The Raise Create Webhook Action allows you to trigger the webhook event a second time, even though a new item hasn't been created. The Webhook would then find and trigger any necessary Workflow processes.
Raise Workflow Created Signal
The Raise Workflow Created Signal is an internal action similar to Raise Create Webhook Action. However, instead of raising a general Webhook that can trigger multiple workflows, you might instead only want to trigger the start of a particular Workflow process diagram.
When this action is performed by clicking on the menu item, the selected Workflow diagram will run the process from any Created of the diagram's "Created Signal" events.
Workflow - Execute Process
This is similar to the Raise Workflow Created Signal. However, instead of triggering the specific Created webhook signal events, this action will trigger the entire process. This is useful when your process does not begin with a Signal Start Event.
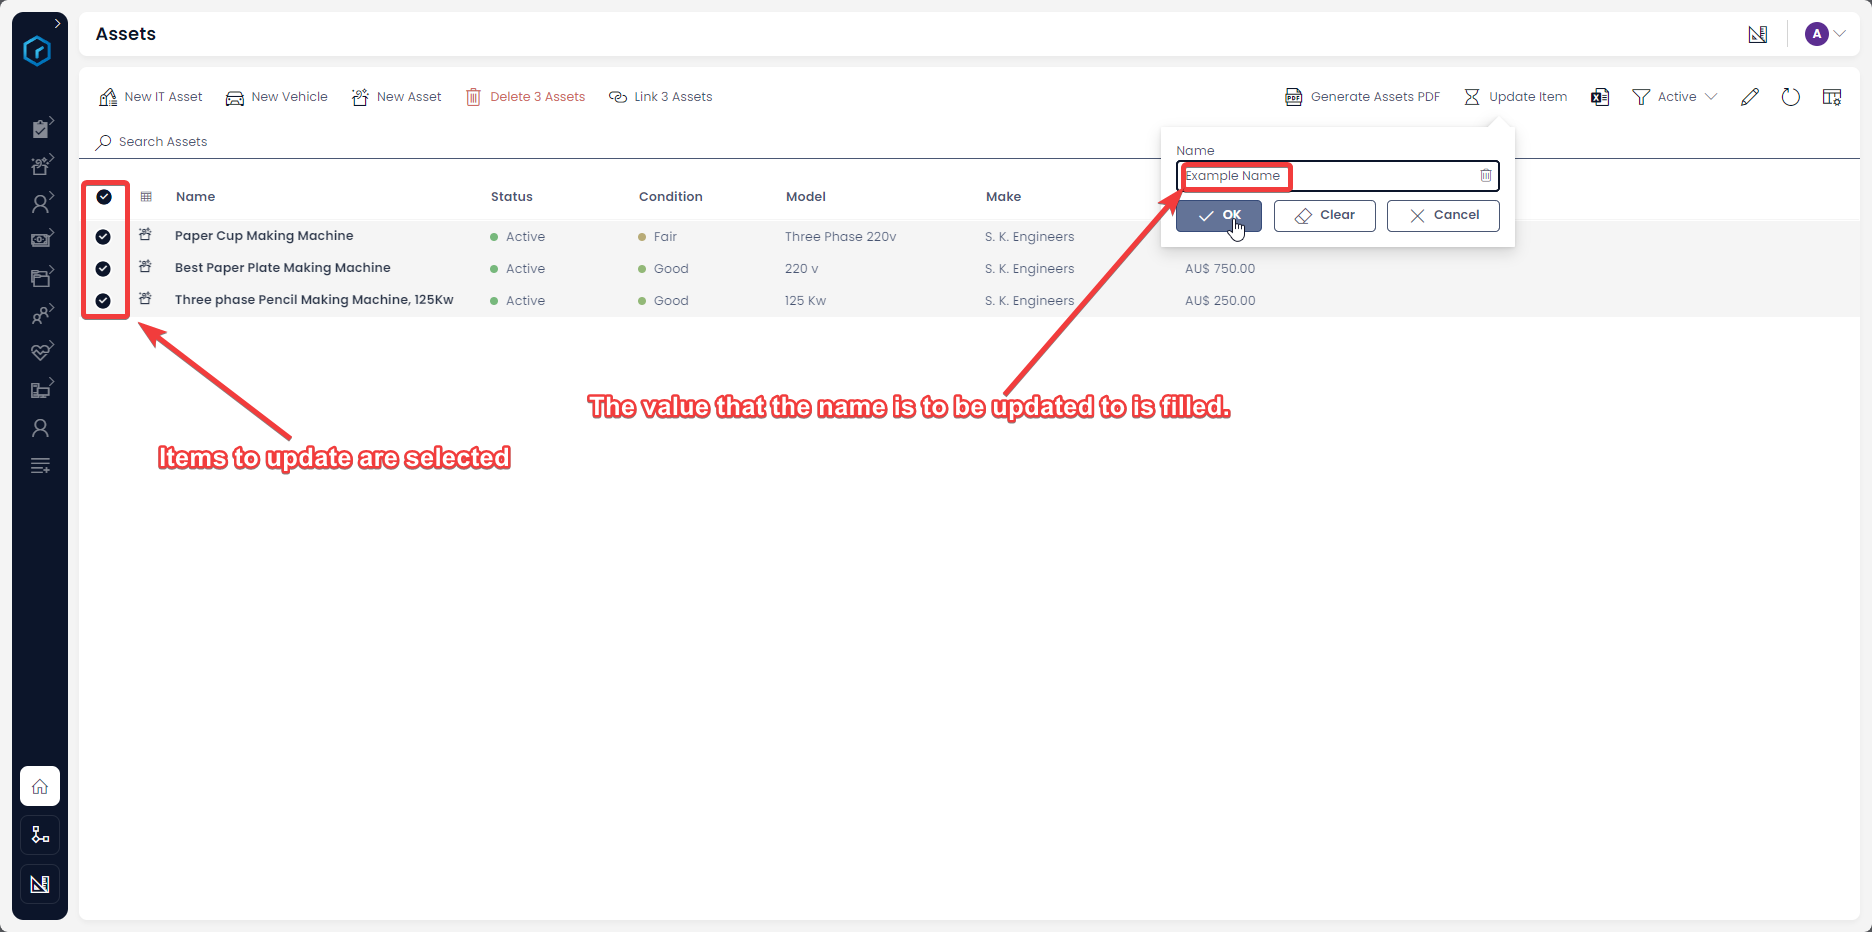
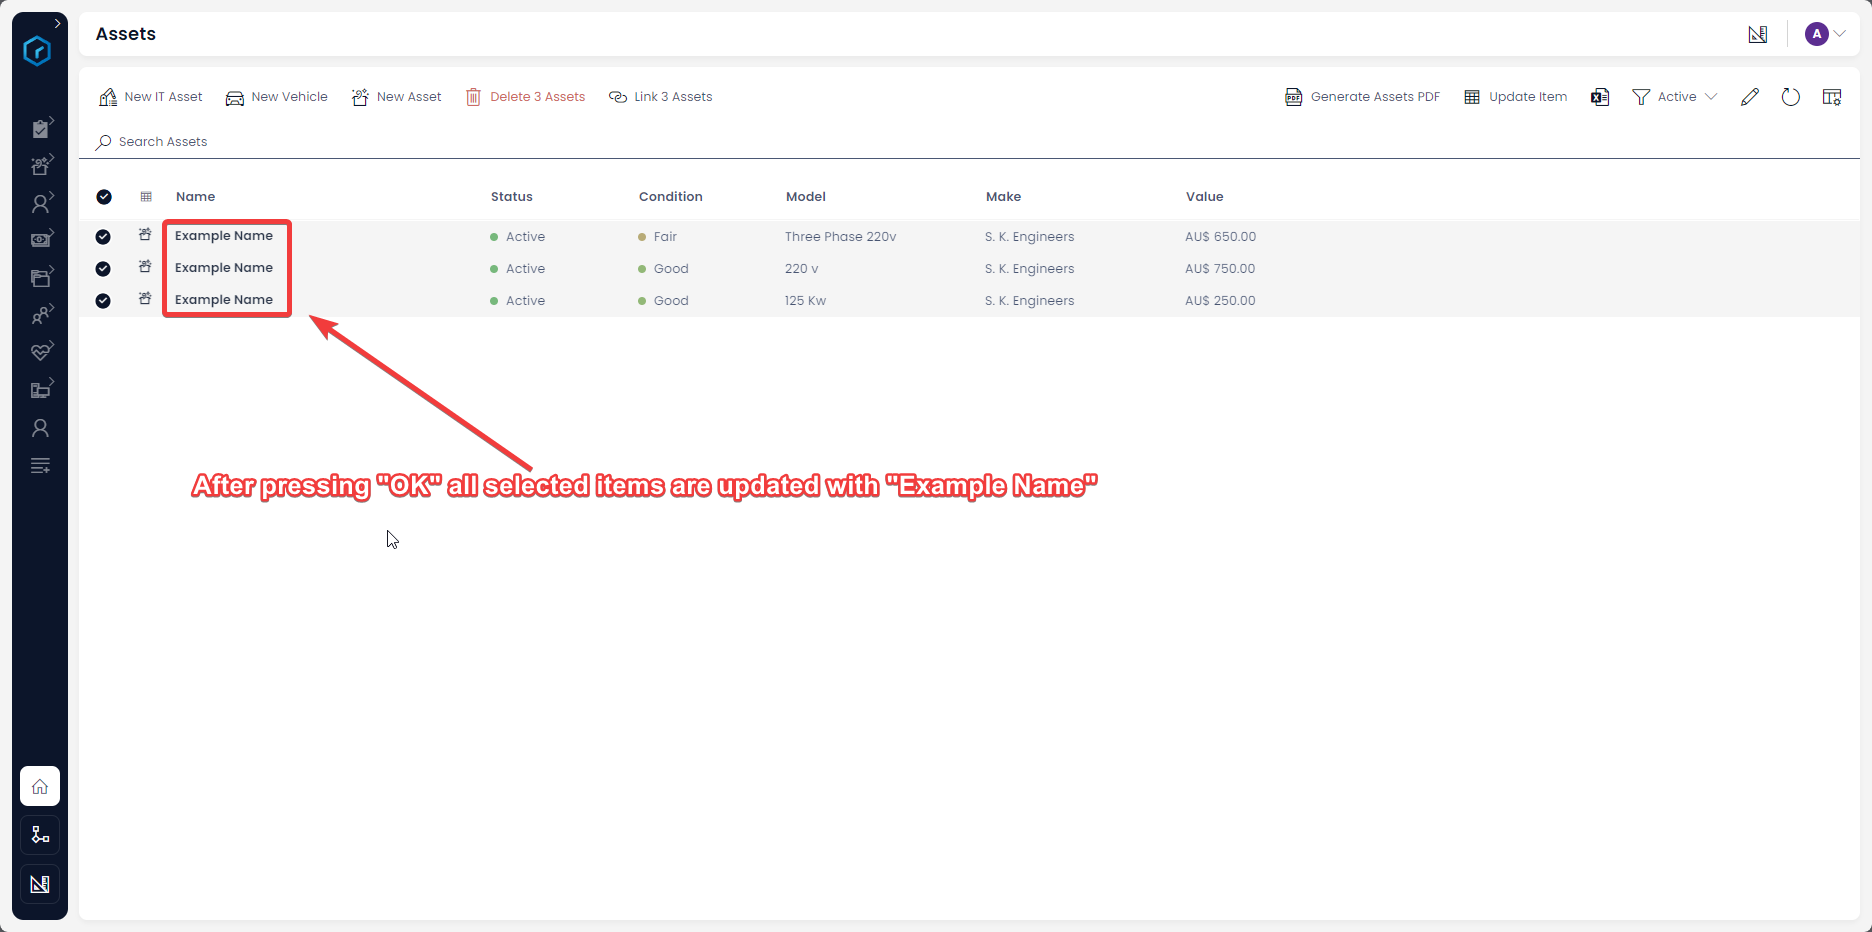
Update Items
This action allows you to update multiple items at a time. For example, you may wish to change the "Status" of multiple leads to "Inactive" if they are not returning your company's calls. Or, you may have added a new column to a table, and now many different items need to be bulk-updated with new data.
The Update Items action allows you to update the data of one or more items. When the button is pressed, an Adaptive Form will open
In the example below, an Update Items action is run to change the value inside several item's Name column at once.
Generate SendGrid Emails
When a menu item is pressed, it can be used to send emails using the SendGrid application (this is an application that can be integrated with your Rapid site).
Using SendGrid, a menu button can:
-
Send a Static (unchanging) email. For example, you may wish to send a generic follow-up email to a client, or a customer satisfaction survey.
-
Send Dynamic (changing) emails. These emails can be formatted so that the name of the client is written into the email body, as well as any other field of information. Creating and automating dynamic emails more complex than static emails.
To use the SendGrid system, you must select an item or items in your Rapid site, and then press the SendGrid menu item to send emails to those specific individuals. Typically, you will want this action to trigger only on items that contain an Email Address column in their Table.
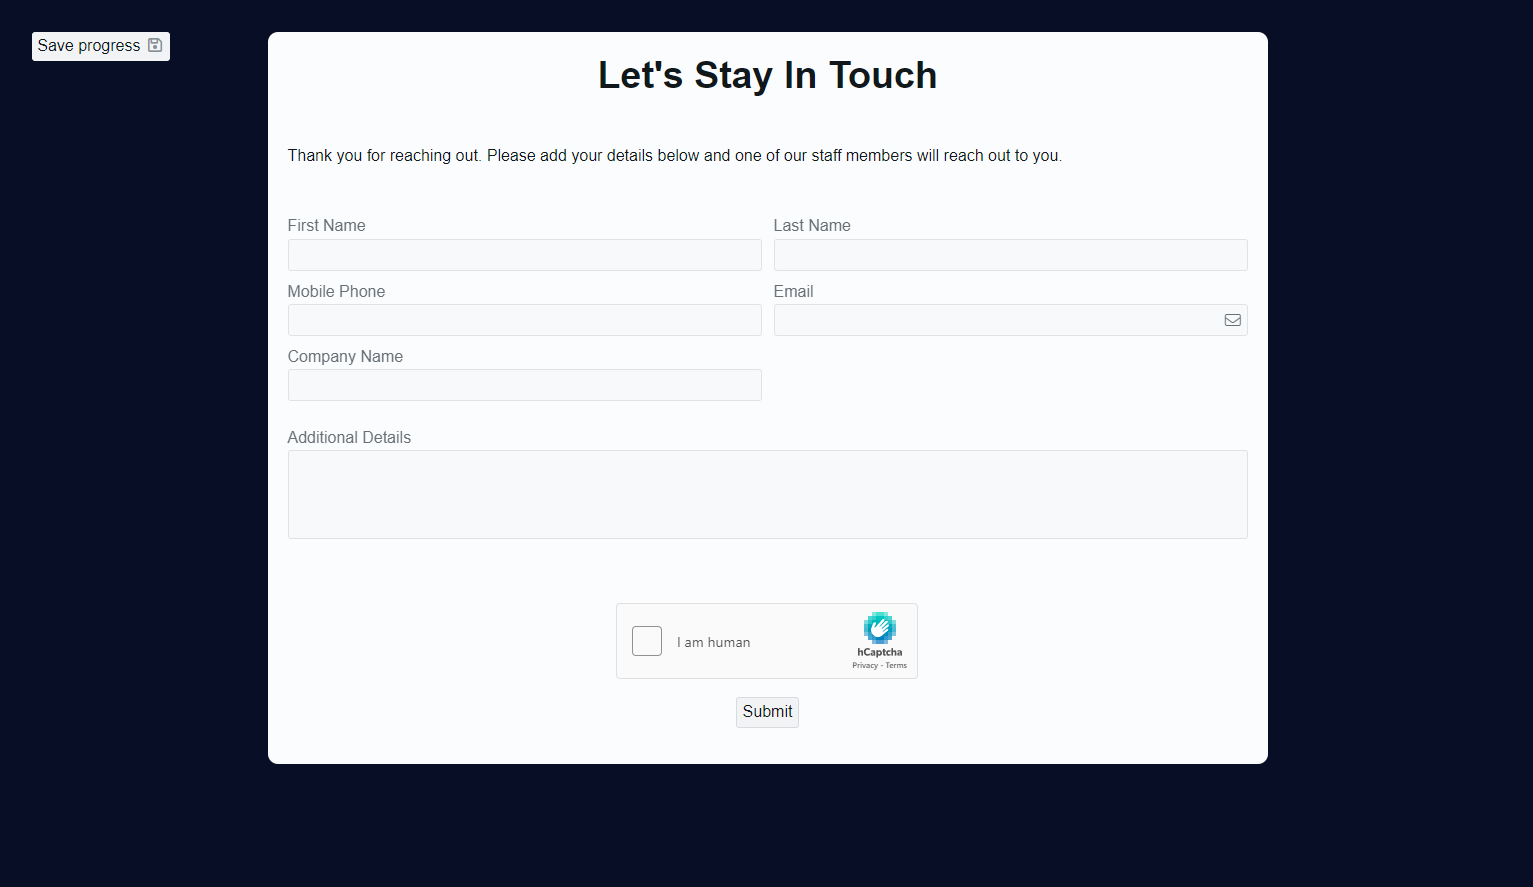
Open Adaptive Documents
Menu items sometimes may open an Adaptive Document for you to fill out. Alternatively, your System Administrator may create a menu item that opens an Adaptive Document to save user time. Consider the following example, where a "Leads Form" is linked to, so that a travelling salesperson or consultant can quickly gather the information of a lead.
![]()
When an Adaptive Document menu item is pressed, it will open the Adaptive Document in a new browser tab.