Adding New Columns to an Existing Table
Let’s examine how to extend the Assets table, by adding a new column.
Stationary Inc. have an annual audit of all their assets, and they want to track what should happen to each asset at this review. For instance, the IT Director may decide they want to remove a laptop from circulation because it is getting too old.
The issue with the current Asset table is that it only tracks the current Status of an item. The IT Director could leave a note on the item, which states whether an asset should be sold, or recycled. However, the note would not allow us to filter a table and find all the assets that should be sold or recycled.
So, let’s build a column that tracks what the company intends to do with each asset.
1. Open the Assets table in Designer
Click here for a reminder on how to open a table in designer.
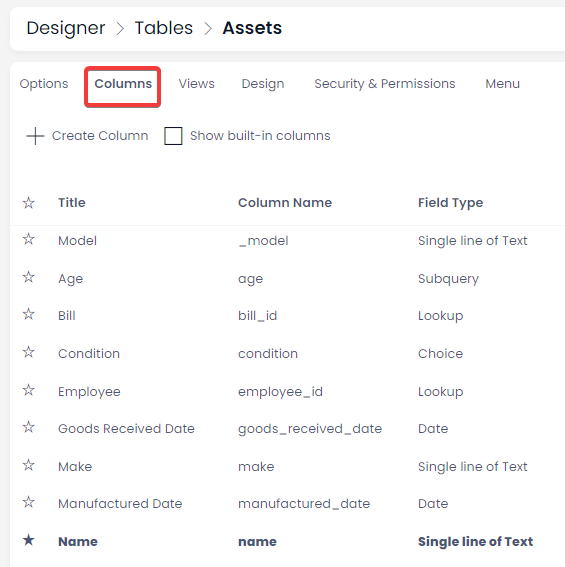
Since we want to build a column, we should press the columns tab at the top of the page.

2. Create a New Column
Here we can see all the columns that are attached to an ASSET. We want to create a new COLUMN, so let’s press the CREATE COLUMN button at the top of the page.
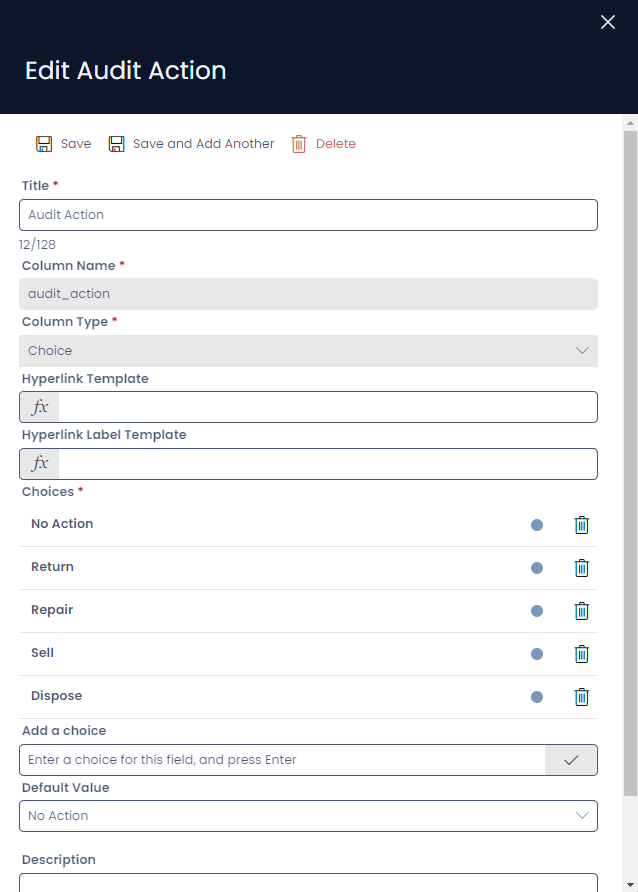
We will give our column the title “Audit Action”. Note that the Column Name field is a protected field. That’s because Rapid Standard needs to build a connection between this column and the table. If we were able to change this column name, it would cause problems in the database. If you need to change a column name, you will have to delete the entire column, and build it again. All the data that you enter the column will also be deleted.
Luckily, we can change the column title to something else, if we need to. This will change the way that the column’s name appears in Explorer, so this is a good option to avoid losing your data. However, the Column Name will always be the same when we look at the column in Designer.
Choosing and Troubleshooting the Column Type
So, which type of data is best for us? We could type our information into a single line of text, or a multiple line of text. E.g. typing information such as “recycle”, or “sell”... but that will lead to problems:
- Users don’t like having to type out the same thing repeatedly
- The data could have issues, such as typing errors, extra spaces, or a person could type something unexpected into the field.
- For example, a user could type “Put in Storage”, and another person could type “Store it”.
- A human can intuit that these are the same thing, but a computer cannot
- It would make it extremely difficult to build a filter or view to see "all the assets that need to go into storage".
Challenge 1: Decide on which data type is most suitable
Using the scenario described above, and decide which type of data should be selected for this column. When you are ready, progress to the next page to check your answer.
You can click here for an explanation of the different types of columns you can create in Designer.
Give me a hint
A Single Line text field and Multiline text field won't help us here.
What if the data is mistyped?
If anything can be entered into a field, it will also make it more difficult to build a view to filter our assets. We need a type of field that restricts the data that can be entered.
Challenge 1 Solution
The best option for Stationary Inc. would be a Choice column. The Choice data type lets us create multiple options that someone can choose from. This means that the data won’t be mistyped, and it will be very easy to build views that can filter all the assets that have a certain choice selected.
1. Name the choice column
Title the column Audit Action.
2. Add the following options to the choice column
Once you have entered an option, press the Enter or Return key to add it. Alternatively, you can press the checkmark.
| Choices to Enter | Reasoning / Description |
|---|---|
| No Action | In case the asset has no problems. |
| Return | For items under warranty. |
| Repair | For assets that can be repaired. |
| Sell | For assets that might be outdated or superseded. |
| Dispose | For assets that cannot be repaired or sold. |
Note: If needed, we can change the order that these options will appear in the dropdown menu, by clicking on a choice, dragging it to a new position, and then releasing it.
3. Enter a default value
For this example, No Action is the best default, because we can expect that the majority of Assets won’t require action.
Your new field should look like the following:

4. Press Save
Scroll to the top of the Create New Asset sidebar, and press Save.